What You Will Need
- Hair extensions: I purchased two bags and only ended up using one (well a combination of the two bundles, but I could have gotten away with just one bundle). One was 12" the other 14".
- Scissors
- Wig Clips: I initially purchased 5 packs of 2 but ended up going back and purchasing 4 more packs. As it turns out since I did not use every weft of hair I could have gotten away with only 8 clips (or 4 packs).
- Needle and thread
Measuring & Sewing Your Wefts
- To create the clip-ins start by threading your sewing needle. I used about a 12" piece of thread just to ensure I had enough the first go around. Once your needle has been threaded tie a small knot at the end to secure the strand.
- Before you begin cutting and sewing your wefts you want to measure the diameter of your head to ensure the wefts actually fit. I recommend doing this once your hair has already been braided (if you are using the braid method) because your head is a bit bulkier with loose hair.
- To measure your head simple start with one end of the weft at the base of your head and stretch the weft straight across (from ear to ear). Once you reach the opposite side of your head use your finger as a marker to hold the place where the weft ended.
- I doubled my wefts for a fuller effect (which may be why I only needed one bundle). To do this simple keep your finger in the same position you measured and fold the shorter end of the weft across the remaining length of the hair and cut where the shorter weft stops.
- Once your weft is sized and cut, using your needle and thread sew the weft together at the base (where the actual track is). Secure the stitch by creating a small knot in the end of the thread and cut any excess string.
- Repeat the above steps for measuring and sewing the wefts moving up from the nape of your neck to the top of your head.
Adding the Clips
- Once your wefts are measured and sew together (if you are doubling) you can begin adding your wig clips.
- The clips I purchased had four holes straight across the top, I sewed them onto the weft using only the first hole and the last hole.
- Before you begin sewing make sure the clip is facing you and the bar/back of the clip is facing the weft.
- Thread the needle through the clip, and the weft, looping it through the first hole twice to secure. Move along to the second hole and loop the thread through twice. Tie a small knot in the thread to secure it, then cut the excess.
- For smaller wefts I used two clips, one on each end, and for larger wefts I used three clips: one on each end and one in the middle.
Short wefts have two clips, longer have three
 |
| The clip should look like this once sewn on |
Installing Clip-Ins
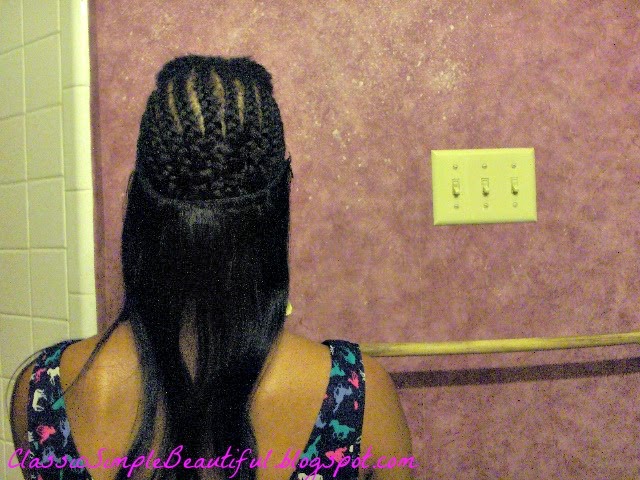
- Because I wanted my clip-in extensions to serve as a protective style I created a "U" part at the top of my head using the center of my eyebrows as a guide; securing this section with a claw clip I then proceeded to braid the remaining free hair.
- If your hair is long and thick like mine you may find it a bit difficult to braid the hair in such a way that relieves the bulk and prevents the braids from dangling down your back poking through your extensions.
 |
| Installing the clips |
- Starting at the base of your head/nape of your neck apply the extension by sticking the clip (open) into the braid and closing it to secure the extension.
- Continue adding the clip-ins until the only visible section of your hair is the section left as a leave out.
- Release the leave out and style according to your extensions to blend.
 |
| After all clip-ins are installed |
Finished Look
| Blend the leave-out with the extensions careful to cover any visible tracks |
I am absolutely in love with these extensions and so glad I forged ahead and completed them. I spent a total of $70.00 on two bundles of hair, wig clips, and a needle and thread; that is about 1/3 the price of the clip-in extensions I have seen online. This was also my first time wearing extensions and I can easily see how so many women are "addicted to weave". They are super easy to install and turn a drab hair day into a fab one within minutes. I feel pretty glamorous wearing them and have received tons on compliments. Aside from that no one has been able to tell I am wearing extensions.
Clip-in extensions are a great way to jazz up your look this Fall while protecting your hair and helping you reach your hair goals.


No comments:
Post a Comment